
PUMPKIN
|
Measures |
The following pattern is my original design.
Please only copy or print this pattern for personal use.
This pattern has not been tested so please contact me if you find any errors.
MATERIALS:
Hook: Size G
Yarn: 4 ply Worsted Weight Yarn (I used Red Heart- light coral & paddy green)
Yarn Needle
Small amount of Polyfil
Stitches used: ch, sl st, sc, hdc, dc.
Difficulty: EASY/MEDIUM
ROW 1: Using light coral, Ch 11. Sc in 2nd ch from hk, sc in next ch, hdc in next 2 ch, dc in next 2 ch, hdc in next 2 ch, sc in last 2 ch, ch 1. turn.
ROW 2: Working in Front Loops Only: Sc in next 2 sts, hdc in next 2 sts, dc in next 2 sts, hdc in next 2 sts, sc in last two sts. Ch 1, turn.
ROW 3: Working in Back Loops Only: Sc in next 2 sts, hdc in next 2 sts, dc in next 2 sts, hdc in next 2 sts, sc in last two sts. Ch 1, turn.
ROWS 4-15: Alternate Rows 2 & 3.
Cut yarn leaving a 10" piece for sewing. Fold the piece with Row 1 and Row 15 together being sure to place the seams (this is the unworked loops of the rows) facing each other. Using the yarn needle, join corresponding stitches by sewing. Do not fasten off... weave the yarn in and out of the row ends and draw the opening closed.
FASTEN OFF.
Stuff the pumpkin with the polyfil. Cut another 10" length of yarn and weave it in and out of the ends of the rows at the opening... draw it closed.
FASTEN OFF.
LEAVES
ROW 1: Ch 5, sc in next 2 chs, hdc in last 2 chs. Rep from * 4 times more. Join with sl st in the first chain you made. (this now looks like a star with a hole in the center). Do Not Fasten Off.
STEM:
Ch 1, begin working around the hole in the center. 2 sc in end of each leaf. Join with sl st. Do Not Turn. Ch 1, alternate 1 sc and 1 sc dec in a continuous round until there are 5 stitches remaining. Fasten off leaving a 10" tail. Using the yarn needle, sew in and out of the 5 stitches and draw the opening closed. Fasten off and then sew the leaves and stem to the top of the pumpkin.
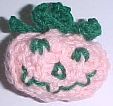
FINISHING: Stitch on a face using the photo as a guide.
HAPPY CROCHETING
BACK TO THE FREE PATTERNS PAGE
CROCHET 'N' MORE PATTERN COLLECTION