Free Crochet Patterns from Crochet N More
| Free Newsletter Four New free crochet patterns each month. Delivered twice a month. |
||
The Dog House Help Us Out CE Links
|


This pattern courtesy of Crochet 'N' More To print a new copy visit:
The following pattern is my original design.
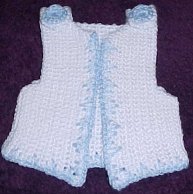
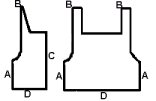
MATERIALS: Bernat Baby Softee Yarn (white and blue) Difficulty: MEDIUM/DIFFICULT Gauge: 4sc = 1" ; 5 rows = 1" FRONT PANEL (Make 2) R1: Ch 30, sc in 2nd ch from hook and in each rem ch. Ch 1, turn. (29 sc). R2: 2 sc in same st as beg ch-1. Sc in each rem st. Ch 1, turn. (30 sc). R3: Sc in each st across to last st. 2 sc in last st. Ch 1, turn. (31 sc). R4: Rep R2. (32 sc). R5: Rep R3. (33 sc). R6: Rep R2. (34 sc). R7: Rep R3. (35 sc). R8: Rep R2. (36 sc). R9: Rep R3. (37 sc). R10: Rep R2. (38 sc). R11: Rep R3. (39 sc). R12: Rep R2. (40 sc). R13: Rep R3. (41 sc). R14: Rep R2. (42 sc). R15: Sc in next 18 sts. Ch 1, turn. R16: Rep R15. R17: Sc in each st across to last 2 sts. Sc dec over last 2 sts. Ch 1, turn. (17 sts). R18: Sc dec over 1st 2 sts. Sc in each rem st. (16 sts). R 19: Rep R17. (15 sts). Fasten Off. BACK R1: Ch 16, sc in 2nd ch from hook and in each rem ch. Ch 1, turn. (15 sc). R2: 2 sc in same st as beg ch-1. Sc in each rem st. Ch 1, turn. (16 sc). R3: Sc in each st across to last st. 2 sc in last st. Ch 1, turn. (17 sc). R4: Rep R2. (18 sc). R5: Sc in each st. Ch 25. (18 sc + 25 chs) R6: Sc in 2nd ch from hook. Sc in each rem ch and sc. Ch 1, turn. (42 sc). R7: Sc in each st. Ch 1, turn. R8-12: Rep R7. R13: Sc in next 32 sc. Ch 1, turn. R14: Sc in ea sc. Ch 1, turn. R15-26: Rep R14. R27: Sc in each sc. Ch 11, turn. R28: Sc in 2nd ch from hook and in each ch and sc across. Ch 1, turn. (42 sts). R29: Sc in each sc. Ch 1, turn. (42 sc). R30-34: Rep R29. R35: Sc in next 18 sc. Ch 1, turn. (18 sc). R36: Sc in each st. Ch 1, turn. (18 sc). R37: Sc in each st across to last 2 sts. Sc dec over last 2 sts. Ch 1, turn. (17 sts). R38: Sc dec over 1st 2 sts. Sc in each rem st. (16 sts). R39: Rep R37. (15 sts). ASSEMBLY:
Holding Front A to Back A, anchor the ends tog with a small knot using the main color. NOTE: The side you have facing you while sewing front and back side A panels together is the inside of the vest. BUTTONS (Make 2): With Blue, ch 3, 11 hdc in the 3rd ch from the hook. Join with sl st in top of beg ch-3. Fasten Off. Overlap the back shoulder over the front shoulder for 10 sts. Weave a strand of the main color through the back of the button. Then sew the button through the front and back shoulder pieces. Tie a knot and weave the yarn tails in on the inside of the vest. I weaved one yarn tail up point B of the front piece and stitch it down to the underside of the back piece to keep in in place. TRIM: I used long single crochet stitches for the trim and I couldn't get a clear picture... but Holding the bottom of the vest to your left, attach the contrasting color (blue) to the first st on the left front panel at the neckline. Now work the long single crochet trim down the front, around the bottom and back up the other front panel. You can add any embellishments you want to if you don't like the look of the edging I used by all means... change it. Fasten Off.
HAPPY CROCHETING
Back to the free crochet patterns directory For stitch abbreviations and instructions please visit our Crochet Basics page:
|
||||||||||