Free Crochet Patterns from Crochet N More
| Free Newsletter Four New free crochet patterns each month. Delivered twice a month. |
||
The Dog House Help Us Out CE Links
|


This pattern courtesy
of Crochet 'N' More To
print a new copy visit:
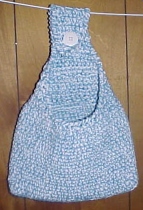
The following pattern is my original design.
MATERIALS: Hook: Size I Yarn: 4 Ply Cotton Hi Lisa ..I think if you say it will take between 8 and 12 ounces of each Large Button (1" or larger depending on your tension) Sewing Needle & Coordinating Thread Optional: Small Piece of Cardboard or Plastic Canvas Stitches used: ch, sl st, sc, sc dec, hdc, rev sc. NOTE: Entire project is worked holding two strands of yarn together. ROW 1: Ch 30, sc in 2nd ch from hk and in each ch across. Ch 1, turn. ROW 2: Sc in each sc. Ch 1, turn. ROWS 3-6: Rep Row 2. Begin working in rounds > RND 1: Working around entire piece...sc in each sc across, placing 3 sc in the corner. Sc in end of each row, 3 sc in next corner. Sc in each rem unworked lp of each foundation ch. 3 sc in corner. Sc in end of each row placing 1 additional sc in the same st as the 1st sc made. Join with sl st in 1st sc. Ch 2, Do Not Turn. RND 2: Hdc in BL only of each st around. Join with sl st in top of beg ch 2. Ch 1, Do Not Turn. RND 3: * Sc dec over next 2 sts. Sc in each of next 5 sts. Rep from * around. Join with sl st in 1st st made. Ch 1, Do Not Turn. RND 4: Sc in each st around. Place Marker. RNDS 5-22: Rep Rnd 4. RND 23: *Sc dec over next 2 sts. Sc in next st. Rep fom * around. Join with sl st in 1st st made. FASTEN OFF. < Begin working in rows again > ROW 1: Fold bag in half to find the center stitch on the front side. Place Marker. Now count 5 stitches to the left of the center and place another marker. Now count 5 stitches to the right of the center and place another marker. Leave all of the stitches between the left and right marker and the stitches in which the markers are placed unworked. Re-attach yarn in the first unworked stitch to the left of the marker on the left side. Sc in same st as joining and in each rem st around to next marker. Ch 1, turn. ROW 2: Sc dec over next 2 sts. Sc in each st around to last 2 sts. Sc dec across last 2 sts. Ch 1, turn. ROWS 3-13: Rep Row 2. ROWS 14-29: Sc in each sc. Ch 1, turn. ROW 30: Rep Row 2. ROW 31: Sc in each of next 2 sts. Ch 2, sk next 2 sts, sc in each of last 2 sts. Ch 1, turn. ROW 32: Sc in each st and each ch across. Ch 1, turn. ROW 33: Rep Row 2. ROW 34: Sc dec over next 2 sts - twice. ROW 35: Sc dec over next 2 sts. Ch 1, Do Not Turn. Working around entire opening and handle... Rev Sc in each st and in end of each row. FINISHING: Attach button at Row 14 and button it through the opening in Row 31.
HAPPY CROCHETING
Back to the free crochet patterns directory For stitch abbreviations and instructions please visit our Crochet Basics page:
|
|||||||