Free Crochet Patterns from Crochet N More
| Free Newsletter Four New free crochet patterns each month. Delivered twice a month. |
||
The Dog House Help Us Out CE Links
|


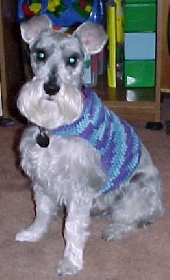
To print a new copy visit: I designed this sweater
for my Miniature Schnauzer, Schotzi.
The original dog sweater pattern
was designed by Lisa Hamblin.
MATERIALS: Hook: Size G (I use Boye brand) Yarn: 4ply worsted weight yarn. Stitches used: ch, sl st, hdc. Difficulty: Easy (since there are no leg holes to shape) Christy's Version: Stomach The pattern for Gizmo's sweater works best with an even amount of stitches. Chest Back Neck Sleeves I hope this isn't too confusing. HERE'S THE ORIGINAL DOG SWEATER PATTERN: RND 1:Using a G hook ch 40, join with sl st being careful not to twist the chain. Ch2, hdc in next ch and in ea ch around. Join with sl st in top of beg ch2. Ch 2. DO NOT TURN RND 2 -7: Hdc in next st and in ea st around. Join with sl st in top of beg ch 2. CH2. DO NOT TURN RND 8: Sl st in next 10 sts, ch 2, hdc in next 19 sts (20 including beg ch 2) ch 2 TURN ROWS 9-13: Hdc in ea hdc, ch 2, TURN. RND 14: Hdc in ea hdc, ch 10. DO NOT TURN. Join with sl st to opposite side of row just completed, ch 2 RND 15: Hdc in ea st and ch around, ch 2 DO NOT TURN RND 16-17 Repeat Rnd 15. Fasten off and weave in ends.
HAPPY CROCHETING
Back to the free crochet patterns directory For stitch abbreviations and instructions please visit our Crochet Basics page:
|
||||||||